The Nanoleaf Skylight is a unique piece of hardware. Unlike most Nanoleaf products that are quick to install or easy to move and replace, the Skylight is designed as a permanent fixture in your home. Instead of simply plugging it into an electrical outlet, you'll need to hardwire it onto your ceiling – and once it's in place, you'll want it to stay there for years.
However, like all electronics, it's possible for your Nanoleaf Skylight to start acting up. And since there's no easy way to get the entire unit down from your ceiling, you might be wondering how you can quickly solve the problem. Thankfully, Nanoleaf designed a simple way for you to reset the Nanoleaf Skylight without the need to disassemble the entire setup.
Here's a look at how to reset the Nanoleaf Skylight to help troubleshoot minor issues or perform a factory reset to clear all your settings.

How to reset the Nanoleaf Skylight
The processes for performing a soft reset and factory reset on the Nanoleaf Skylight are almost identical. Performing a soft reset will reset the Wi-Fi connection and any paired connections. Your saved scenes, however, will remain untouched. A factory reset wipes your Wi-Fi connection, paired settings, and your saved scenes.
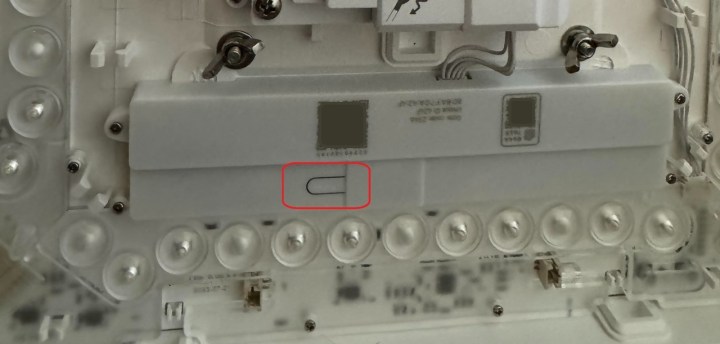
Step 1: To perform a soft reset, pop the cover off the main controller of your Nanoleaf Skylight. This can be done by inserting a flat object into one of the many notches on the side of the cover, then giving it a slight twist.
Step 2: With the cover removed, look for the small reset button. It's shaped like a tab and is easy to miss – consult the above picture if you need help locating it.
Step 3: Press the reset button for5 seconds.
Step 4: The Skylight should restart at a lower brightness than usual. After it finishes booting up, it'll turn up to full brightness and is ready for pairing.
Step 5: Wrap up the process by deleting the old device from your Nanoleaf app and re-pairing it.
You can perform a factory reset by following the same steps as above, but instead of holding the reset button for 5 seconds, you'll hold it for 10. Once again, the Skylight panels will glow at a low brightness before shining brightly. This indicates that the unit is ready for pairing. Delete the device on the Nanoleaf app, and you can then re-pair it.
Nanoleaf notes that if neither of these resets fix your problem, you may need to contact customer support. And if you're getting the "unreachable error," be sure to look into the troubleshooting process for that particular issue, as it follows a slightly different procedure.
Editors' Recommendations
- Samsung Spring Sale: Get up to $915 off smart ranges today
- DeWalt Spring Black Friday sale: Power tools and accessories from $15
- This BLUETTI portable power station is truly weatherproof
- Samsung’s new Smart Refrigerators are already discounted
- The Narwal Freo X Plus is an entry-level robot vacuum loaded with premium features


