'ZDNET Recommends': What exactly does it mean?
ZDNET's recommendations are based on many hours of testing, research, and comparison shopping. We gather data from the best available sources, including vendor and retailer listings as well as other relevant and independent reviews sites. And we pore over customer reviews to find out what matters to real people who already own and use the products and services we’re assessing.
When you click through from our site to a retailer and buy a product or service, we may earn affiliate commissions. This helps support our work, but does not affect what we cover or how, and it does not affect the price you pay. Neither ZDNET nor the author are compensated for these independent reviews. Indeed, we follow strict guidelines that ensure our editorial content is never influenced by advertisers.
ZDNET's editorial team writes on behalf of you, our reader. Our goal is to deliver the most accurate information and the most knowledgeable advice possible in order to help you make smarter buying decisions on tech gear and a wide array of products and services. Our editors thoroughly review and fact-check every article to ensure that our content meets the highest standards. If we have made an error or published misleading information, we will correct or clarify the article. If you see inaccuracies in our content, please report the mistake via this form.
How to use Windows Backup to restore key files and settings onto a new PC

So, you're switching from one Windows computer to another and want to transfer certain files and settings to your new PC. One free and easy way to do that is with the built-in Windows Backup app. Available in Windows 10 and Windows 11, the Backup tool lets you back up specific folders, apps, settings, and credentials to the cloud. When you set up your new computer, you can then apply the backup to restore all your items. Here's how.
Also: The best Windows laptops: Expert tested and reviewed
First, you need a Microsoft account, as the backup will be stored in the cloud using OneDrive. Work and school accounts aren't supported. By default, OneDrive offers 5GB for free. If that's not enough to back up all the items you need, then you have to pay for a Microsoft 365 plan.
The main drawback with the Windows Backup tool is that it will back up only certain locations and items. For example, it won't back up and restore traditional desktop applications, such as Microsoft 365. As a result, you should make sure that you have the installation tools for all the desktop apps you need to reinstall. Still, the tool will give you a head start when you need to transition from one PC to another.
How to use Windows Backup
1. Launch Windows Backup
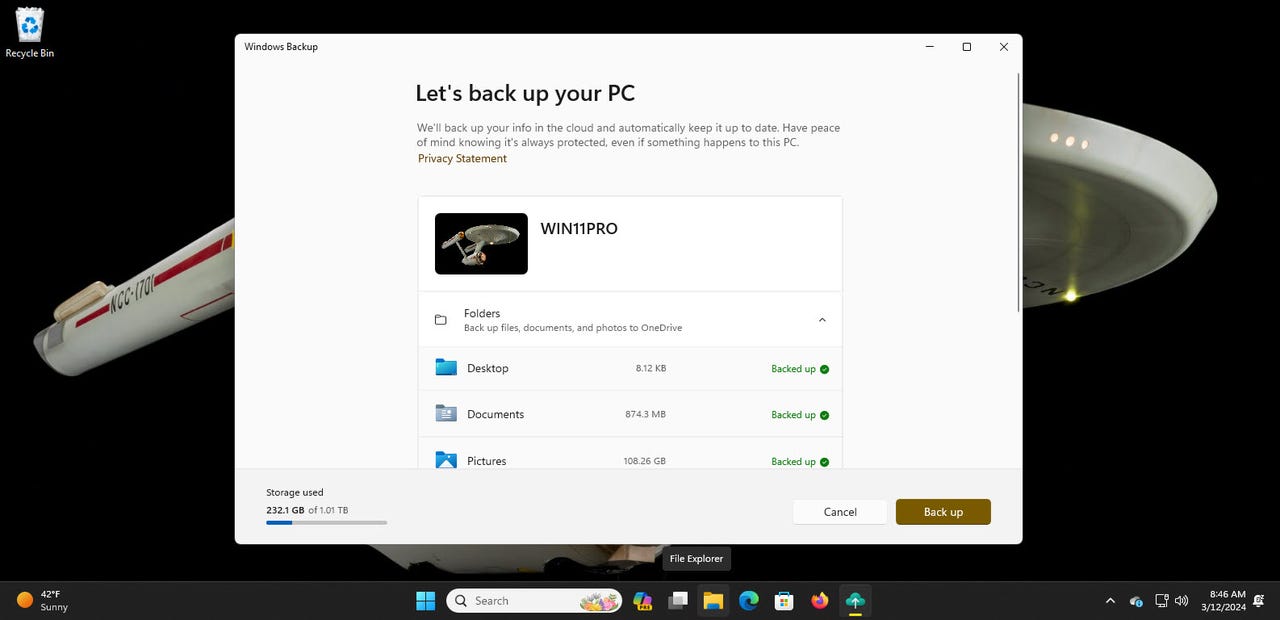
First, power up the PC you want to back up. In Windows 10, click the Start button and select Windows Backup from the menu. In Windows 11, click the Start button, go to the All Apps screen, and then select Windows Backup. The tool's main screen will appear.
2. Configure Windows Backup folders
The Windows Backup tool offers four different categories to configure—Folders, Apps, Settings, and Credentials. To start, click the down arrow for Folders. Turn on the switches for Desktop, Documents, and Pictures, depending on which folders and files you want to back up.
3. Configure Windows Backup apps
Next, click the down arrow for Apps. Make sure the option is turned on for Quickly access apps on any Windows device as this will generate a list of installed apps and let you recover them when you restore your backup.
4. Configure Windows Backup settings
Click the down arrow for Settings. Here, the tool displays options for Accessibility, Personalization, Language preferences and dictionary, and other Windows settings. Turn on the switches for any that you need to back up. If in doubt, leave them all turned on.
5. Configure Windows Backup credentials
Finally, click the down arrow for Credentials. Make sure the switch is turned on for Accounts, Wi-Fi networks and passwords.
6. Start the backup
When you're ready, click the Back up button. The items you selected will be backed up to your Microsoft account's OneDrive storage. You can minimize Windows Backup and continue with other work while the tool works in the background.
7. Check the backup
To check on the backup's progress, simply return to Windows Backup. The tool will indicate which items have been backed up so far. When the entire backup is done, you should see that each of the four categories have been backed up.
8. Set up your new PC
Power up your new computer and kick off the Windows setup process. At some point, you'll see a screen welcoming you back and telling you that you have backups saved from your previous PC. Click the link for More options.
9. Choose the backup
Look for and click on the name of the backup of your previous PC. Click the button for Restore from this PC. The items from each of the four categories will be restored to your new computer. After the process has finished, continue with and complete the setup.
10. Sign into your new computer
Sign into your new computer. Check the Start menu, Settings screen, and File Explorer to confirm that your apps and settings have been restored. Some of your Windows apps will be available, but your desktop applications will need to be reinstalled.
Head to the All Apps menu. Any app that needs to be reinstalled will display an arrow with the word Install. In some cases, clicking the app will automatically reinstall it, or at least take you to the Microsoft Store where you can download and install it.
