In improving overall graphics infrastructure performance, Intel Graphics Control Panel has a key role to play. However, when you download the Intel Graphics Control Panel from the Microsoft Store and launch it from its location, the application may fail to launch. If you face this issue, then this post may help you.

Intel Graphics Control Panel not opening
Before proceeding to the solution, let us find why this error occurs in the first place. It is believed, the device manufacturer, sometimes, pushes and installs DC drivers through Windows Update service. As a result, the DC driver overwrites any DCH driver, installed earlier. Mind you, the Intel Graphics Control Panel application downloaded from the Microsoft Store is still not removed.
This leads to two instances of the Intel Graphics Control Panel trying to run on the system simultaneously, causing neither of them to open. Do the following and see if that helps you:
- Click Start.
- Got to the Settings.
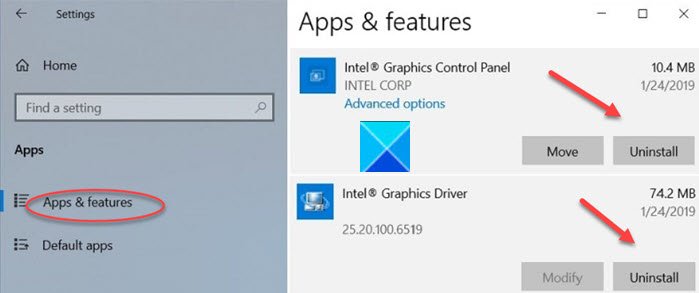
- Chose Apps & Features.
- Locate Intel Graphics Control Panel and Intel Graphics Driver.
- Uninstall the two.
- Restart the computer.
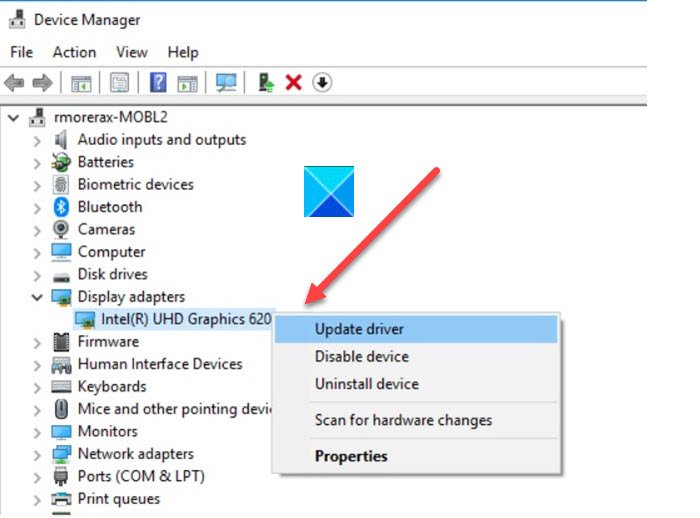
- Go to Device Manager.
- Click Display Adapters.
- Right-click the Intel HD Graphics Adapter and click Update Driver.
Read the below description for more details!
Click the Start button, located at the bottom, and choose the Settings option.
Click the Apps tile to go to the Apps and Features section.

Here, locate the entries for Intel Graphics Control Panel and Intel Graphics Driver.
Uninstall the drivers and Restart the PC.
Open the Device Manager > Display Adapters.

Here, right-click the Intel HD Graphics Adapter and choose the Update Driver option.
Next, click Search automatically for the updated driver software link.
Wait for a few seconds as Windows Update will automatically search for, download, and install the latest graphics driver validated for your computer.
Alternatively, when the same error is followed by a message that says GfxUI.exe is missing, you can follow a different course of action to resolve the issue.
Right-click the Intel Graphics Control Panel shortcut and choose ‘Open file location.’ When directed to a new page, locate the shortcut file, right-click it again, and choose the ‘Open file location’ option one more time. You should be directed to a new folder like:
C:\WINDOWS\system32
Here, you should find a file called GfxUIEx.exe is highlighted. That’s the control panel you’re trying to open. Simply double-click the file to Intel Graphics Control Panel in Windows 10.
This should resolve the issue permanently.
