 The Nokia 7 Plus features Carl Zeiss branded dual lens optics that promises stellar performance in varied lighting conditions
Nokia 7 Plus, the latest mid-range smartphone from HMD Global’s 2018 Nokia portfolio arrived in India last month. The smartphone has a classy design with Android One onboard that offers pure Android experience, along with an efficient Qualcomm Snapdragon 660 processor capable of delivering smooth performance. The Nokia 7 Plus is beautifully crafted with copper accents surrounding the frame, matte finish coating (Black edition) and subtle curves that make it look and feel like a premium phone. There are a lot of things Nokia got right with this handset.
An arresting aspect on the Nokia 7 Plus is its Carl Zeiss branded dual lens optics that promises stellar performance in varied lighting conditions. The smartphone uses a 12MP primary lens with f/1.75 aperture and a 13MP telephoto lens with f/2.6 aperture. The telephoto lens provides 2x lossless optical zoom and you can use 10x telephoto zoom as well. The camera with efficient hardware manages to take good detailed shots with true-tone colours.
But while we say stellar performance, no camera can simply deliver remarkable performance in all conditions without a bit of effort from the user’s end. In this article, we will talk about the different modes that you can play around with to get even better shots with the Nokia 7 Plus in different situations:
Use HDR mode to have better range of colours, brightness and contrast
Although there is no hard and fast rule as to when to use HDR mode, it is recommended to keep this mode on while taking shots in broad daylight or around twilight. HDR mode basically takes multiple shots at different exposures in rapid succession and combines them to produce a more vibrant image with better contrast. The Nokia 7 Plus offers decent dynamic range, and with HDR mode, the camera manages to capture images with better highlights and good colour reproduction. While the HDR mode delivers reliable images in good lighting condition we recommend users to select the ‘HDR On’ option instead of ‘HDR Auto’ to get the desired shot.
Pro mode
While most of us often like capturing pictures in Auto mode, there is a Pro mode available in the Nokia 7 Plus that allows tweaking a few settings to keep the noise from creeping into the images and produce good detail. The smartphones (mid-range and premium category) these days come with this feature integrated on the camera app. The Nokia 7 Plus offers Pro mode with four options that you can adjust and set depending on the subject that you are capturing and the light in the background.
The Pro mode includes white balance, manual focus, ISO and exposure settings. The ISO settings range from 100-3200 and shutter speed ranges from 1/4 fraction of a second to 1/500. You can launch the Pro mode by tapping on the hamburger icon (three horizontal lines) on the top left corner and then select the Pro mode. While taking shots under bright sunlight you can keep the ISO settings to its minimum level and increase the shutter speed to get images with good saturation and better details. Further, you can switch the Focus mode to manually adjust and tap on the subject to accurately lock focus on it.
Telephoto Zoom
As we mentioned, the Nokia 7 Plus has a 13MP telephoto lens that offers 2x lossless optical zoom and you can increase up to 10x digital zoom when you need it. Ideally, refrain from using digital zoom. The lens comes in useful while taking shots from a distance. The images tend to get soft with low contrast but at least it shows decent detail of the subject taken from the far distance. We tried using the lens in both good light and poor light condition and result turned out to be good while capturing pictures in good light. The images came out bright with mid-tone colours. However, we observed a fair amount of noise creeping into the images as the light dropped.
 The Nokia 7 Plus has a 13MP telephoto lens that offers 2x lossless optical zoom and you can increase up to 10x digital zoom when you need it
Live Bokeh
The widespread Portrait mode prevalent in almost every smartphone these days is termed as Live Bokeh on the Nokia 7 Plus. The mode works well when there is good amount of light surrounding the subject and you can adjust the amount of blur effect you want to add to the shot. Further, it notifies if you are too near to a subject. While this sounds good, the autofocus tends to get a bit inconsistent which means you need to have patience on your part to hold the phone still, adjust till it locks focus on the subject and then click it.
 The Live Bokeh mode on the Nokia 7 Plus works well when there is good amount of light surrounding the subject and you can adjust the amount of blur effect you want to add to the shot
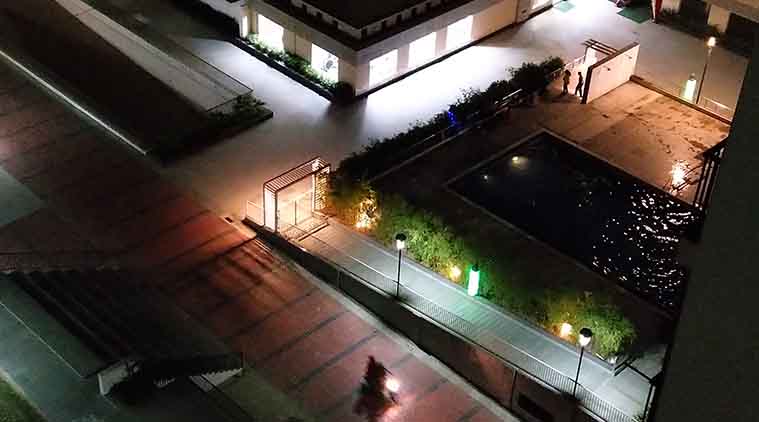
Low-light shots
The Nokia 7 Plus manages to produce good shots in low light courtesy of its wide f/1.75 aperture that fills in light in poorly-lit conditions. While auto mode comes in handy shooting images in certain scenarios, the focus cannot accurately lock on the subject while taking pictures in low light. We switched to Pro mode and tweaked the settings, keeping the focus in manual mode, decreasing the shutter speed and adjusting the ISO level to get better result.
 The Nokia 7 Plus manages to produce good shots in low light courtesy of its wide f/1.75 aperture that fills in light in poorly-lit conditions
The dual-tone LED flash on the Nokia 7 Plus manage to keep the shots to its somewhat natural skin tone but we would rather recommend avoiding using flash while taking shots indoor. Further, when taking low-light shots, you can tap on the darker area for better exposure. And in case you are not fond of using the Pro mode, then patience and perseverance will help you get the best out of it.